# Tutorial
This is an introductory tutorial for building a GraphQL server with Lighthouse. While we try to keep it beginner-friendly, we recommend familiarizing yourself with GraphQL (opens new window) and Laravel (opens new window) first.
The source code of the finished project is available at nuwave/lighthouse-tutorial (opens new window).
# What is GraphQL?
GraphQL is a query language for APIs and a runtime for fulfilling those queries with your existing data.
GraphQL provides a complete and understandable description of the data in your API, gives clients the power to ask for exactly what they need and nothing more, makes it easier to evolve APIs over time. Enables powerful developer tools.
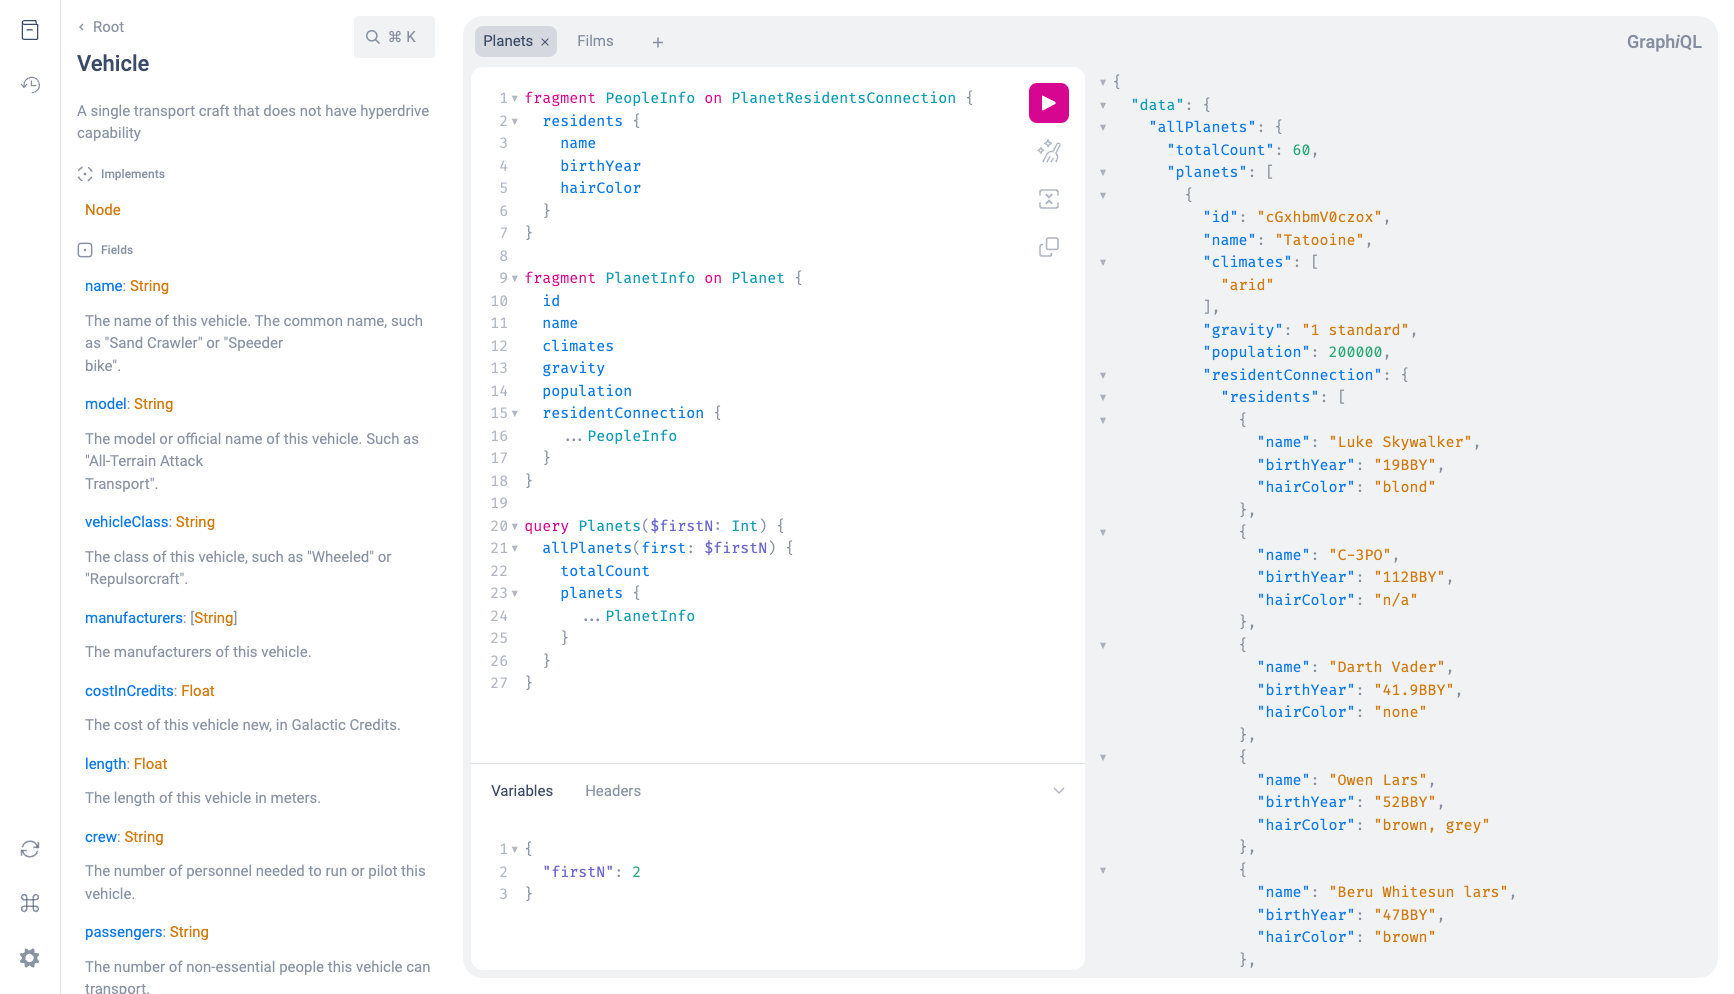 GraphiQL
GraphQL has been released only as a specification (opens new window). This means that GraphQL is in fact not more than a long document that describes in detail the behavior of a GraphQL server.
GraphQL has its own type system that’s used to define the schema of an API. The syntax for writing schemas is called Schema Definition Language (opens new window) or short SDL.
Here is an example how we can use the SDL to define a type called User and its relation to another type Post.
type User {
  id: ID!
  name: String!
  posts: [Post!]!
}

type Post {
  title: String!
  author: User!
}
Note that we just created a one-to-many relationship between User and Post.
The type User has a field posts that returns a list of Post types.
We also defined the inverse relationship from Post to User through the author field.
# What is Lighthouse?
Lighthouse integrates with any Laravel project to serve a GraphQL API.
The process of building a GraphQL server with Lighthouse can be described in 3 steps:
- Define the shape of your data using the GraphQL Schema Definition Language
- Use directives to bring your schema to life
- Add custom functionality where you need it
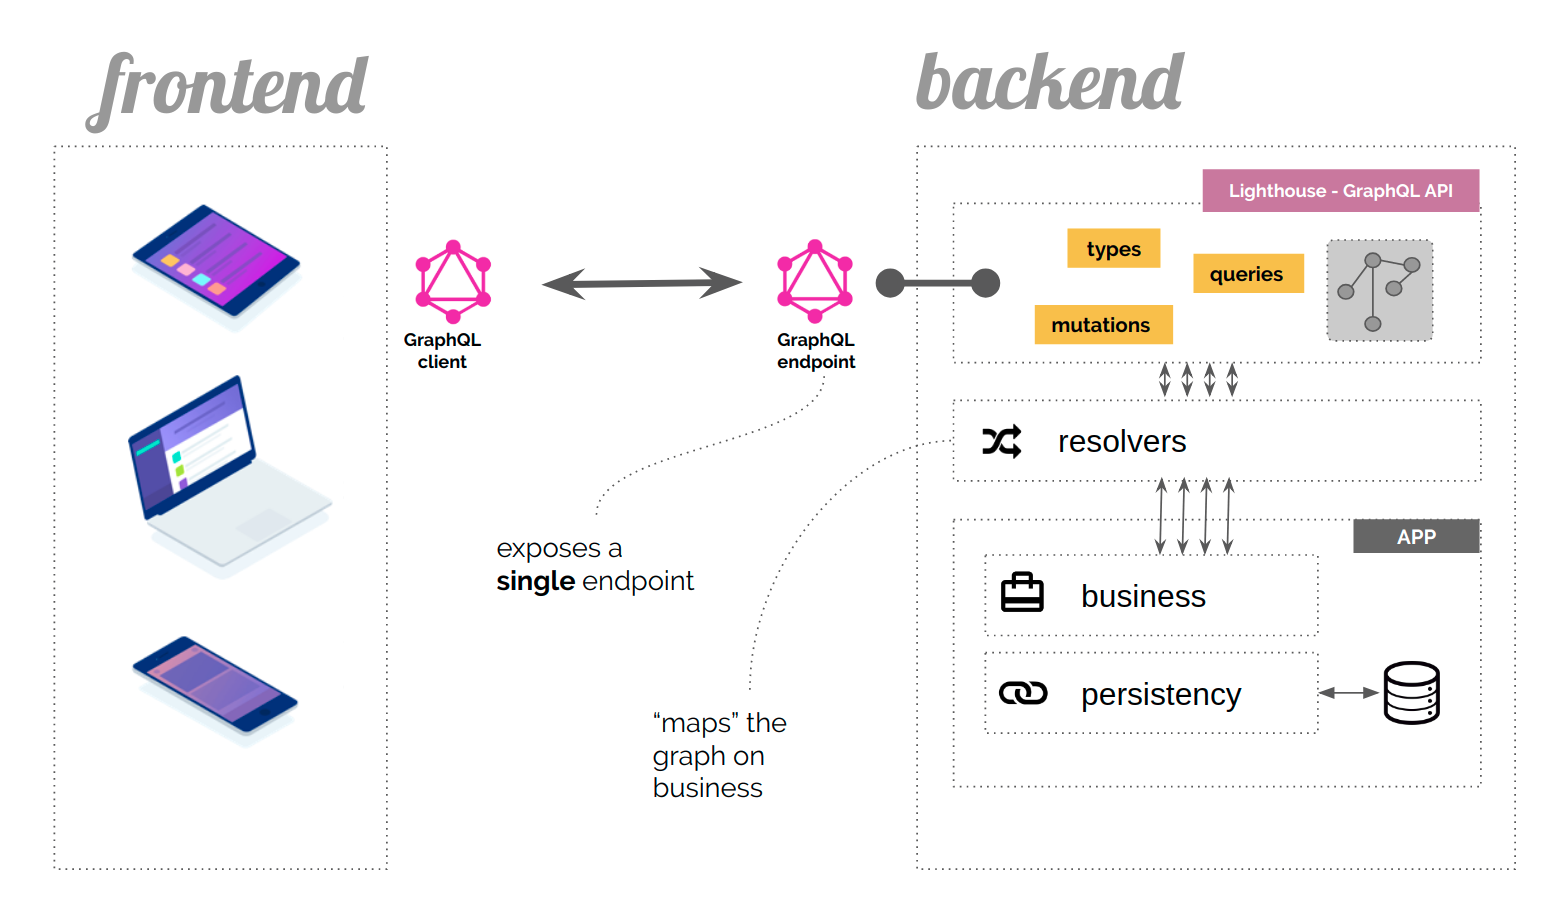 The role of GraphQL in your application
# Agenda
In this tutorial we will create a GraphQL API for a simple Blog from scratch with:
- Laravel
- Lighthouse
- GraphiQL
You can download the source code for this tutorial at [https://github.com/nuwave/lighthouse-tutorial](https://github.com/nuwave/lighthouse-tutorial) :::
# Installation
# Create a new Laravel project
This tutorial starts with a fresh Laravel project.
You can use an existing project and skip ahead to Installing Lighthouse. You may have to adapt a few things to fit your existing app as we go along. :::
Create a new project by following installing Laravel (opens new window).
Consult the Laravel docs on database configuration (opens new window) and ensure you have a working database set up.
Run database migrations to create the users table:
php artisan migrate
Seed the database with some fake users:
php artisan tinker
\App\Models\User::factory(10)->create()
# Installing Lighthouse
Use composer (opens new window) to install Lighthouse:
composer require nuwave/lighthouse
Publish the default schema to graphql/schema.graphql:
php artisan vendor:publish --tag=lighthouse-schema
We will use GraphiQL (opens new window) to interactively run GraphQL queries:
composer require mll-lab/laravel-graphiql
To make sure everything is working, access /graphiql and try this query:
{
  user(id: 1) {
    id
    name
    email
  }
}
# The Models
This first part will show you how to set up the models and database migrations and does not include any specifics related to GraphQL or Lighthouse.
Our blog follows some simples rules:
- a user can publish multiple posts
- each post can have multiple comments from anonymous users
We can model this in our database schema like this.
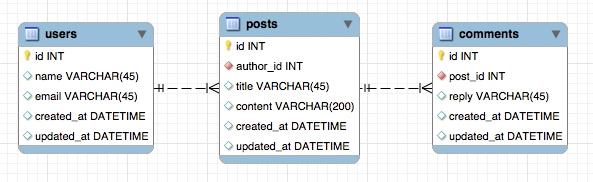
Database relations diagram
Begin by defining models and migrations for your posts and comments
php artisan make:model -m Post
Replace the newly generated app/Models/Post.php and the create_posts_table.php with this:
namespace App\Models;

use Illuminate\Database\Eloquent\Model;
use Illuminate\Database\Eloquent\Relations\HasMany;
use Illuminate\Database\Eloquent\Relations\BelongsTo;

final class Post extends Model
{
    public function author(): BelongsTo
    {
        return $this->belongsTo(User::class, 'author_id');
    }

    public function comments(): HasMany
    {
        return $this->hasMany(Comment::class);
    }
}
use Illuminate\Support\Facades\Schema;
use Illuminate\Database\Schema\Blueprint;
use Illuminate\Database\Migrations\Migration;

return new class() extends Migration {
    public function up(): void
    {
        Schema::create('posts', function (Blueprint $table) {
            $table->id('id');
            $table->unsignedBigInteger('author_id');
            $table->string('title');
            $table->string('content');
            $table->timestamps();
        });
    }

    public function down(): void
    {
        Schema::dropIfExists('posts');
    }
};
Let's do the same for the Comment model:
php artisan make:model -m Comment
namespace App\Models;

use Illuminate\Database\Eloquent\Model;
use Illuminate\Database\Eloquent\Relations\BelongsTo;

final class Comment extends Model
{
    public function post(): BelongsTo
    {
        return $this->belongsTo(Post::class);
    }
}
use Illuminate\Support\Facades\Schema;
use Illuminate\Database\Schema\Blueprint;
use Illuminate\Database\Migrations\Migration;

return new class() extends Migration {
    public function up(): void
    {
        Schema::create('comments', function (Blueprint $table) {
            $table->id('id');
            $table->unsignedBigInteger('post_id');
            $table->string('reply');
            $table->timestamps();
        });
    }

    public function down(): void
    {
        Schema::dropIfExists('comments');
    }
};
Remember to run the migrations:
php artisan migrate
Finally, add the posts relation to app/Models/User.php
namespace App\Models;

use Illuminate\Database\Eloquent\Factories\HasFactory;
use Illuminate\Database\Eloquent\Relations\HasMany;
use Illuminate\Foundation\Auth\User as Authenticatable;
use Illuminate\Notifications\Notifiable;
use Laravel\Sanctum\HasApiTokens;

final class User extends Authenticatable
{
    use HasApiTokens, HasFactory, Notifiable;

    /**
     * The attributes that are mass assignable.
     *
     * @var array<int, string>
     */
    protected $fillable = [
        'name',
        'email',
        'password',
    ];

    /**
     * The attributes that should be hidden for arrays.
     *
     * @var array<int, string>
     */
    protected $hidden = [
        'password',
        'remember_token',
    ];

    /**
     * The attributes that should be cast to native types.
     *
     * @var array<string, string|\Illuminate\Contracts\Database\Eloquent\Castable>
     */
    protected $casts = [
        'email_verified_at' => 'datetime',
    ];

    public function posts(): HasMany
    {
        return $this->hasMany(Post::class, 'author_id');
    }
}
# The Schema
Let's edit graphql/schema.graphql and define our blog schema, based on the Eloquent models we created.
We add two queries for retrieving posts to the root Query type:
type Query {
   ...
+  posts: [Post!]! @all
+  post(id: Int! @eq): Post @find
}
The way that Lighthouse knows how to resolve the queries is a combination of convention-based naming - the type name Post is also the name of our Model - and the use of server-side directives.
- @all returns a list of all
Postmodels - @find and @eq
are combined to retrieve a single
Postby its ID
We add additional type definitions that clearly define the shape of our data:
type User {
  id: ID!
  name: String!
  email: String!
  created_at: DateTime!
  updated_at: DateTime!
  posts: [Post!]! @hasMany
}

type Post {
  id: ID!
  title: String!
  content: String!
  author: User! @belongsTo
  comments: [Comment!]! @hasMany
}

type Comment {
  id: ID!
  reply: String!
  post: Post! @belongsTo
}
Just like in Eloquent, we express the relationship between our types using the @belongsTo and @hasMany directives.
# The Result
Insert some fake data into your database, you can use Laravel seeders (opens new window) for that.
Visit /graphiql and try the following query:
{
  posts {
    id
    title
    author {
      name
    }
    comments {
      id
      reply
    }
  }
}
You should get a list of all the posts in your database, together with all of its comments and the name of the author.
Hopefully, this example could demonstrate the power of GraphQL and how you can serve your own GraphQL API with Lighthouse.
# Next Steps
The app you just built might need some more features. Here are a few ideas on what you might add to learn more about Lighthouse.